Showing posts with label gardening. Show all posts

Thursday, April 26, 2012

Low Tech Lavender Propagation

English Lavender branch

Do you have lanky lavenders and can't do a thing with them?  Are you planning on pruning them but waiting until you find a way to reuse those branches?  Well I have good news!  You don't have to toss those cuttings into the compost heap, you can root them instead!

Whacking back a potted lavender

Here is a very simple propagation technique that gardeners have been doing since Methuselah was a baby and all it takes are some of those branches you just pruned off, a shovel, a spot of sunny soil to plant them in and...some patience.  Seriously, I'm not kidding, that's it.  You have got to give this a try.  When I first found out about this it really amazed me that it could be this simple.  Here, let me show you what I mean.

As simple as sticking it in a hole really!

Some of you may be familiar with the propagation technique called layering, where you pin a branch of a shrubby plant to the ground while it is still attached to the main plant, cover it with a bit of soil and wait.  Well this is sort of like that.  Last spring I cut a branch off of one of my lavenders and basically just stuck it in the garden with a little water and a little prayer and walked away.

The woman who taught me this method says branches that are 12 inches long work best...I think she may be right, but who knows.  Anyway my cutting was more like 8 inches long.  After cutting off the branch I pulled all the leaves off except the few at the top that would form the base structure of what would become my new lavender plant.

Snug as a bug in the mud

Out to the veggie garden I went, cut branch in hand, to dig a nice deep hole for the little branch.  It needed to be buried right up to it's neck, just below where the leaves stopped, and settled in with a little water.  The last step proved to be the trickiest...walking away and forgetting about it.  It became like trying not to peek at a present and having to stare at for days and it just went on and on, all through the summer and into the fall until finally it was winter and I got some relief from not having to see it as often.  And NO, I did not peek, not once!

Eeek! Are those new leaves? Wait, I just planted it!

Fall was the hardest season for me because I just knew there were roots forming down there and I am too curious for my own good sometimes.  If I dug up the cutting to peek I knew I would risk injuring the new roots which would mean I just killed another one.  I can't count the number of plant starts I have killed with anxious curiosity.  (Ugh.)  This would been so much easier if it would have been stuck in the ground where I wanted to plant a lavender.  One could grow a whole hedge of lavender that way.

Small roots but they'll grow

So the end of March came and it was time to dig it up. (Yippee, I can open my present!)  When I lifted it out of the soil I saw the roots were not as well formed as I had hoped.  Two meager roots had formed at the base of the branch and some nicer looking feeder roots up near the top.  I took a chance and cut off the lower section and again said my prayers and planted it up in a pot of potting soil so it could get a better chance of thriving if it was going to at all.

Please God, let it grow up strong and healthy

Answered prayer in the form of bright green new growth.

Today my baby lavender has more new leaves forming...a very good sign. I will be leaving it in this little container most of the summer just to be sure and pinching it back a couple of times to help keep it nice and shrubby.

So the next time you prune your lavender give this a try and let us know how it goes.

Happy Gardening!


Copyright © 2012 by Patty Hicks
All rights reserved. No part of this blog may be reproduced or transmitted in any form or by any means, electronic or mechanical, including printing, recording or by any information storage and retrieval system without written permission from the author, except for the inclusion of brief quotations in a review. All reviews must include author's name and a link back to this blog.


Wednesday, January 19, 2011

How To Know When It's Time: Starting a Small Business: Part 1 Circumstances and Timing

This is the number one biggest topic in gardening...How do I know its time...time to sow seeds, when is it time to harvest or time to prune the roses or the fruit trees, or cut back the perennials?  How do I know when its time?  I got a fresh reminder of this question when I went out to check my bird feeders and found the black oil sunflower seed sprouting after a week of unseasonably warm and damp weather.

It was in the 50s all week last week...warm enough to sprout seeds

For one second I thought, "Gee, I should sow some sunflower seeds today."  It made things worse when I noticed the tall flower buds on my Hellebore and then the crocus shooting up out of the ground.

Yellow Cloak Crocus in mid January

Then it hit me...its only January!!! I think I'll wait a little before I give that desire any more thought.  Everything in its season for a reason.  I'm experiencing some parallels in my own life like this right now too.

Things still freeze solid in January

I just became a business owner for the first time a couple weeks ago.  This was not something I planned for, just like I didn't plan for those sprouting seeds, but is something that I needed to do after suddenly landing a contracted freelance writing job, my first job ever in this field. (I'm still pinching myself.)  It was so surreal  after years of only being able to dream of owning a business where I could work doing what I love to do, where my creativity could flourish.  Before now I was never able to get the legs underneath the hope I had for one reason or another and the dream of running my own business and creating the many things I wanted to make kept needing to be put off.  My story is a good example of how quickly things can change and how timing is sometimes everything.

I'm finding that creating a plan for my business has been very parallel to planning a garden for the first time, including having to wait until the brush gets cleared away before it can be built.

An congested corner in my garden needing a new look.

Circumstances and timing came together to suddenly push me out onto my future. Here I am trying to figure out what products to make like I used to have to choose what plants to grow.  I'm needing to find a workshop to work in which is not unlike evaluating a landscape and deciding where to place a garden.  Location is an important factor to the success of both and a hastily made decision can bring frustration and or failure in both worlds.

Hellebore seed pod ripening

Pretty soon I will be looking for seed money to feed my new little business and help further establish its foundation and future growth just like I've shopped for soil amendments that will help improve the soil in my garden giving the plants a healthy foundation to grow in.

Finally I am seeking the wise counsel of those who have traveled this path before because know I don't know what the heck I am doing and have a ton of questions about what comes next.  When I was in junior high school a teacher of mine told our class that the only stupid question is one that never gets asked. I am working hard to be fearless about asking any question I have no matter how silly the question may sound to me.  When I don't ask questions I find I am always wishing I would have and wondering if I got things right.

If only I had asked the question I wouldn't be stuck here!

If it had happened any other way I'm certain I would have second guessed the timing, fought with my own insecurities and probably never even have started a business at all .  Because of how things have come together I know the timing is right and it makes it a lot easier to forge ahead in the process so my patience is paying off.  If things aren't coming together for you I recommend you take a step back, maybe it isn't time yet.  But if it is, jump on that pony, hang on tight and ride!

I know this is somewhat of an unconventional look at starting a small business but we are each individuals in individual circumstances so take it for what its worth and I hope you have been inspired.


Copyright © 2011 by Patty Hicks
All rights reserved. No part of this blog may be reproduced or transmitted in any form or by any means, electronic or mechanical, including printing, recording or by any information storage and retrieval system without written permission from the author, except for the inclusion of brief quotations in a review. All reviews must include author's name and a link back to this blog.

Wednesday, January 12, 2011

Seed Box Wisdom Part 1

With the arrival of the seed catalogs comes the reminder that its time to sort through the seed stash.  If you are like me you have a lot of seed packets in that stash and over the years have spent endless hours going through them, dreaming, organizing, swapping and etc. As I was going through my box last week I was recounting all the mistakes I've made and realized there are a lot of you who may not have the slightest idea some of the things you may be doing that are possibly damaging your little treasure of seeds and causing failure...I know that was me.  I'm hoping by what I share in this series of posts will help you avoid some common pitfalls and benefit from some ideas that really work.

Organize for better production is key to reaping a good harvest.
#1 - Shopping
Being a wise seed shopper is sometimes a hard thing to do if you love to garden.  How many of you feel like a drunk in a liquor store when it comes to buying seeds and find yourselves sucked into the marketing tactics of seed purveyors?  You are not alone.  (I raise my hand)  Seed companies are masters at getting us to drool over every new or reintroduced variety of seed out there; note those gorgeous photos and well worded descriptions, its their job after all to get us to part with our money for their products.

A small sampling of what comes in the mail.
It seems this is pretty easy to get us to do too because of the simple fact that one seed packet don't cost much and if we fall prey to their tactics we will soon have spent a small fortune.  I figure I've wasted at minimum a couple hundred dollars over the past 15 years and probably much truth be told.  Just think, I could have bought a really nice little fountain with that money or other needed things. These days my rule of thumb is this...I have to have a place to grow it, I have to have a good reason to grow it (food, beauty or utility) and it has to be a good value.  I am notoriously cheap as a gardener after working in the nursery industry, a fact I find ironic...maybe it was just easier to get more stuff that way.  So lets take a look at some tips to help you with your seed stash.

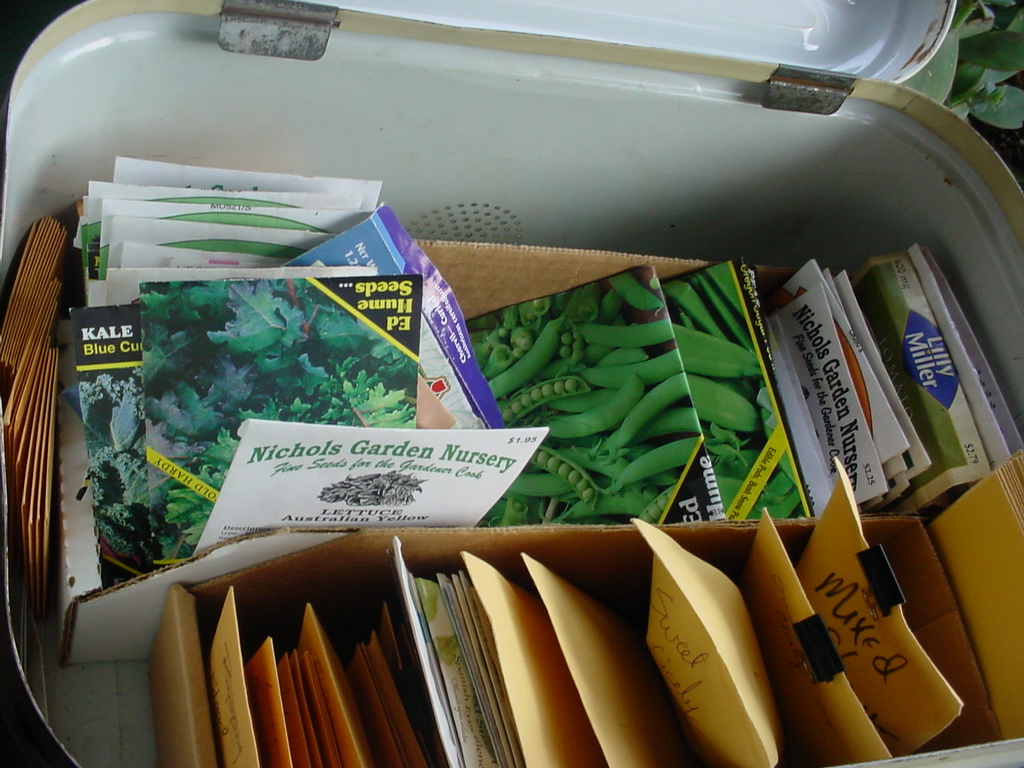
My bread box turned seed box where all my treasured seeds are stored
#2 Where are your seeds?
I know that may sound simple enough for many of you to answer but there are so many people I know who just toss the seeds any old place.  It becomes an important question I think when you consider that seeds cost money you wouldn't stash dollar bills in junk drawers or other odd places.  I'm of the mind that seeds need to be kept in one place and kept in an environment that will ensure their viability for as long as possible otherwise I may as well just flush that cash down the toilet or toss it out the window.  When we buy seeds we are investing our money in the hope of a harvest so make that money go as far as it can.

#3 Know what you have!
How many of you have your seeds organized so you can quickly see what you have?  I'm guessing not many.  I used to hoard seeds and love to collect them from any where I could which left me with two huge boxes of seed packets and a very long list of what was in those boxes.  Needless to say there was no good way for me to keep up with what needed to be sown let alone remember what I had.  It was so exciting getting new varieties every year but honestly, its so much more exciting to me these days to actually reap a harvest from the seeds I have than just be a collector and keeper of the stash like I used to, if you know what I mean.  If you want to take hold of the reigns of your stash you have to make some hard decisions...get rid of what you won't sow and organize the rest so it makes sense and serves you the gardener in your efforts to garden.

Organized and ready to sow!

#4 Know what to throw out!
I have bad news...seeds don't last forever.  Its true and that's why its important to go through and edit your seed stash every year. Seeds get old and as they do their ability to germinate declines.  So how do you know what is maybe getting old or is no longer good?  Start by looking at those dates on the seed packets.

Save this date!
Oops that may me cost later.
If you forget and accidentally cut off the date its good to have a pencil handy to make note of that date on the package somewhere so you don't loose track of it again.  This is important because take onions for instance, onion seed is only good for one year which means you will need to replace it every year while tomato seeds last for several years.  The old seed can be tossed onto compost heap and if you're lucky, some of it may sprout but don't hold your breath.  Finally its a lot more fun to find unexpected plants you can transplant than to find the seeds you have sown were dead after you waited a month for them to germinate so just get rid of them already!

#5 - Knowing when to sow.
Its easy to find good information on this subject out there today.  Tons of garden blogs offer tips, Local Master Gardener offices and websites have seed sowing schedules as do seed companies and even some nurseries.  When you find one that suits your region keep a copy of it in with your seed stash, it will save your bacon and help you stay on track with your sowing.  It was interesting when over and over again I found people suggesting seeds should be stored in the order in which they are sown seasonally.  What genius!  A system that tells you what needs to be sown by a quick peek in the stash box!  Another thing about this system is it is not static but a migrating system.  That means if you have a crop like kale, that is sown more than once in a growing season, you just transfer that packet of seeds from its first position in the system up to the next month/season it needs to be sown in and it will be ready and waiting when you are.  Its a really beautiful system for the home vegetable garden or any garden actually.

Extra seeds saved just to give away
#6 - Seeds are for sharing!
Storing seeds and swapping seeds are really beneficial to most gardeners as seed packets hold more seeds than the home gardener will use in a year in most cases.  This makes a well organized stash a gold mine of sorts for if you have extra seed and wish to share them with others or to have on hand for a little seed swapping.  Seed swapping is totally fun and can be addicting though so be ware!  If you have a lot of extra seeds consider your local food bank as a place you might share them with.  More people are gardening than ever and those seeds could go to help feed a family or beautify an elderly person's yard, so put those still viable seeds in the hands of folks who can use them up before they die.

Happy Gardening!

Copyright © 2011 by Patty Hicks
All rights reserved. No part of this blog may be reproduced or transmitted in any form or by any means, electronic or mechanical, including printing, recording or by any information storage and retrieval system without written permission from the author, except for the inclusion of brief quotations in a review. All reviews must include author's name and a link back to this blog.

Friday, November 19, 2010

Tomato Season's End At Tinker's Paradise

It has arrived, the end of tomato season, of growing lush lettuces and cucumbers and other warm weather crops.  The summer here in Oregon was the coolest one on record and made even getting a ripe tomato a challenge.  Thankfully early fall was fairly warm and mild which brought some help though rain brought late blight to many before the tomatoes even ripened.  I'm sure this year will be the one we judge all other trying years by for years to come.
August tomatoes still very green
Not to be thwarted by our cool summer this year, I had my husband put a tent over the top of our plants.
Mr. Ben and the tent poles
 This was the year I determined to work hard to do my tomatoes right, pruning and watching the feeding and watering.  The weather was not going to ruin all that hard work!  Green tomatoes were not what I was looking for, so up went the tent about two months ago.
Got it up just before a very wet week...Whew!
Good thing we did it too as I was picking ripe tomatoes off the plants just last week and earlier this week finished picking the green and partially ripe ones that still remained as freezing weather was looming over the horizon.
I see green tomato chutney in our future

It is a bittersweet thing to pick the last green tomatoes off the plants.  It says we will have no more fresh tomatoes from our gardens once what is ripening on the windowsill is gone.  We will be forced to purchase those less than desirable grocery store varieties which pale in comparison to our lovely home grown toms.  I don't know of anyone who doesn't grumble some at the less than tasty store bought tomato we find ourselves forced to eat in the off season...especially come spring when we are so hungry for a fresh salsa or slice of tomato on a sandwich that actually has some flavor to it.  One thing that I am reminded of though is that any good thing is made better if we do not have it around all the time.  I think this is something we really need to be thankful for especially when it comes to the food we grow.  Seasonal eating becomes a delight as one season's flavors move to take the place of another and much less boring than if we had it our way all the time. .
Tomato plants in the heap that will feed the soil for next year
 As I pulled up the plants and placed them on our compost heap I found myself thankful for the effort I put into the production this year even if the weather brought a less than luxurious harvest.  It was an investment worth making if only for the things I learned.  I challenged myself to get over the fear of the unknown when it came to pruning, I paid attention to the needs of the plants and they rewarded me as best they could and that is all I can ask of them.  Next year I can go into the season with more confidence because I did challenge myself to learn more too.  That was a harvest worth reaping that tastes as good as any tomato ever could.

When you harvest the last of what you love in the garden remember all the lessons learned and the delight you received in the process and be thankful for this season if rest as it affords you time to lay in your garden plans for next year as you dream of future home grown tomatoes.

Copyright © 2010 by Patty Hicks

All rights reserved. No part of this blog may be reproduced or transmitted in any form or by any means, electronic or mechanical, including printing, recording or by any information storage and retrieval system without written permission from the author, except for the inclusion of brief quotations in a review. All reviews must include author's name and a link back to this blog.

Sunday, August 22, 2010

Sprouting Peas in August

This is a week of great anticipation as its time to get my fall peas sown.  I decided that I would pre-sprout the peas.  This time of year it really isn't necessary but it does serve a good purpose if one does pre-sprout the peas...it will show you the most vigorous plants when you see them begin to shoot out that first root.  Its not the leaves that sprout out first but the root.  (There has to be an object lesson in that picture somewhere but I'll leave it for a later post.)

At my house my husband prefers snow peas and I prefer the sugar snap peas.  Snow peas are the flat podded peas often used in stir fry and must be harvested before they get peas in them for the best flavor.  Sugar snap peas are best after the peas have gotten some size on them and are quite juicy and sweet.  A wonderful snack in the garden and kids usually love them because they are so sweet and juicy.

What you will need:
  • Pea seeds
  • Small cookie sheet/jellyroll pan or tray (with sides on it is best so if any peas decide to try to escape they won't roll off onto the floor.)
  • Small bowl or drinking glass
  • Warm water
  • Plastic wrap
  • Paper towels
  • Water proof marking pen (ball point pen would work fine too)
  • Plant tag (Get this done now so you can mark what you planted where...its often too easy to forget otherwise)
  • Warm spot like the top of a refrigerator (but not hot)
The very first thing I do is to set up the pan where the seeds will be laid out once they are done soaking.

Take the tray or pan you are using and line it with a paper towel. The more seed you are going to sow the bigger the pan/tray will need to be so keep that in mind.  I suppose you could us a cardboard box with low sides like the ones canned food or pop come in but you would have to line the bottom with plastic wrap so it doesn't get all soggy.  Whatever you use it needs to be sturdy enough to carry out to the garden once the seeds have sprouted.  I also recommend lining aluminum pans with plastic as the aluminum will react to being wet for extended periods of time.

How I set my aluminum baking sheet up.
So you have your paper towel in the bottom of your flat container.  Label the dry paper towel with the name of what it is you are sprouting.  Since I was doing two types of peas I drew a line down the center and labeled each side accordingly so later.  You will also notice I set the glasses for each variety on its respective side of the pan to avoid getting them mixed up.  This really comes in handy if you are doing a few different varieties of peas such as I often do with my flowering sweetpeas and do not want the colors all jumbled. That way later on you can plant them out with their specific color in mind instead of have a mixed bag of bloom colors.

Hard as rocks pea seeds just put into their water bath for soaking.
After 8 hours of soaking no more wrinkles and nicely round.
Figure out how many seeds you will need to sow and count them out into the container you will be soaking them in.  It is recommended that you add a couple extra just in case some are not viable.  Cover them with warm water to about 1" above the seeds.  This is important because the seeds will swell quite a bit and you want them to stay beneath the water surface.  Set them off to the side away from direct sunlight for about 6 to 8 hours which is about how long it takes to get them fully loaded with the water that they need for sprouting. Warm is better than cold because the seeds will respond to it faster but do not use hot water as it can damage or even kill the seeds.

Because pea seeds sprout so quickly you want to avoid leaving them in the water for too long or risk drowning the seed.  And the reason you want to soak them in the first place is to aid there germination.  Soaking just mimics what takes place in nature, only in nature the process is much slower as the soil temperatures are cooler and water can only be taken in from the moist soil surrounding the seed.

That shriveled one in the middle has got to go!
Once the seeds are soaked you can line them out on the paper towels for sprouting.  Be sure to watch for any culls, those seeds that did not swell, and toss them out.  You want fresh healthy seeds that are ready to get growing and its not worth trying to see if that shriveled seed will grow...believe me I know...I tried and failed too many times and wasted precious garden space because of it too.

Moisten the paper towel bed with a little bit of water, place another layer of paper towel on top of the seeds and moisten it too.


 Finally cover the whole works with plastic wrap and set on top of the refrigerator or other warm location until the seeds have germinated. Its best to not put them in direct sunlight as it can get too hot beneath that plastic with the sunlight shining on it.

The seeds take about 24 to 36 hours to sprout so check them at least once a day until they are sprouted. You need to keep on top of it as far as getting them planted soon after they sprout or they will root right into the paper towels which can be a real mess when it comes to planting time.
The promise of future produce and encouragement for the heart.

Aren't these amazing!  These seeds were soaked 8 hours and set on the top of my fridge for 36 hours.  Now that is instant gratification and encouraging enough for anyone to believe they can grow from seed.  Wouldn't you agree?

NOTES:  Peas can be sown in late winter (February) for a spring crop and again in summer for a fall harvest.  For spring crops its recommended (especially for flowering sweet peas) to amend the soil with steer manure in the fall where you plan on sowing them the next spring.  It is also a good idea to treat your seed with an inoculent containing Rhizobium leguminosarum, a bacteria which helps the plants to fix the nitrogen which in turn aids in keeping them healthy and increase production.  This also causes the roots of the pea plants to form nitrogen nodules which are beneficial as a fertilizer in the soil.

Copyright © 2010 by Patricia Hicks

All rights reserved. No part of this blog may be reproduced or transmitted in any form or by any means, electronic or mechanical, including printing, recording or by any information storage and retrieval system without written permission from the author, except for the inclusion of brief quotations in a review. All reviews must include author's name and a link back to this blog.

Saturday, August 14, 2010

Seeds Seeds Seeds!

I don't remember exactly when I started saving seeds.  It was probably back when I was taking horticulture classes and working in the garden at a local historic site about a dozen years ago or more.  I remember one year where I saved over 95 varieties of seed which even today blows my mind.  That is a lot of seed!  All I know is there is not a year goes by that I don't save the seeds from something.  This year was no different.
(Clockwise starting top left) Lychnis coronaria 'Angel's Blush', 'Bijou' lettuce, can't remember but its a nice perennial for shade, Blood Sorrel and Poppy.

This afternoon I spent some time going through the garden, cutting ripe seed heads so I could save the seed.  The cutting of the seed heads is always nice quiet work and brings back the memory of the flowers in all their glory. It stirs gratitude in my heart for this gift of seeds for future plants too as the seeds spill from the heads into the buckets and bags I am gathered in. The extracting of the seeds from the head is not quite as cathartic work and takes a bit more patience, but the end result is worth the effort.  Seeds to sow and seeds to share.  It is a good thing to know how to do and so I decided I would give you a look into what it takes to harvest, clean and store lettuce seed.
Lettuces rarely cross pollinate making them great to save seed from.

Lettuce is one of those plants that rarely if ever cross pollinates so if you have a lettuce growing in your garden that you enjoy you can let it go to seed you will be able to grow that same variety from your collected seed.  The variety I saved seed from this year was one that actually wintered over very nicely in my garden and grew well even with our excess spring rains.  It also holds well in the heat and doesn't get bitter as easily as some and one more thing...its a knock out beauty with amazing wine colored leaves that don't fade ever!  Now that is a lettuce worth keeping.  Finally it is no longer available in U.S. seed catalogs so I would have to order it from across the pond in the U.K. making me even more thankful I have saved seed for the past few years.

As a plant lettuce comes in basically two forms...loose leaf, which is a mound of leaves called a rosette or a head like Romaine and the old standby Iceberg lettuce many of us grew up on.  When the plant begins to bolt, or run to flower as some call it, the flower stem in the center of the plant emerges instead of leaves making the plant appear to be stretching upward.  This is what you want to see as a seed saver.  This process can take a while so don't expect to see flowers for a few weeks once the plant begins to stretch.
Bijou in flower early July
Lettuce beginning to bolt
Next the flowers open...soft yellow flowers which in the case of my Bijou lettuce looked quite nice against the burgundy leaf color.  The flowers don't open all at once so you have some time before you have to start thinking about harvesting.  After the flowers fade you will see these cute little puffs of fuzz, somewhat reminiscent of dandelion which is in the same family as lettuce.  Once you start to see the puffs form you can sit back and watch and wait as the plant continues to flower. Lettuces have a lot of flower heads on one plant and not all of them open at once.  The reward, if you are patient, will be a bounty of seed.

Bijou Lettuce with seed heads and flowers in late July
You can harvest the flowers as they form the puffs but here's the deal...lettuce, like dandelion, has this white sap that is sticky and gets all over your fingers and the puffy stuff and seeds making harvesting in this fashion a real pain so I don't recommend it.  What I found was that the slightest bump of the flower stems made that sap flow out in little dots all over the stem and flower head...it was a nightmare.  The sap needs to be tried up before you attempt harvesting the seed and as long as that stem is connected to the plant it's gonna will flow.

Because of the annoyance of the sap during my early seed harvesting attempt, I decided to it was best wait until the plant was pretty full of puffs and nearly done flowering before trying again.  When it was finally time I cut the whole head off the plant, placed it in a paper grocery bag and set it on our back porch for about a week to dry up the sap before again I attempted to harvest the seed.  I suppose I could have waited a bit longer to cut the flower heads off but I get paranoid about the seed falling to the ground as we get some pretty stiff winds in our area this time of year so I erred on the side of safety.

Once the sap was dried up I was able to cut the branches off the main stem so I could work with them much easier.  I think at this point I would recommend laying the branches out on a cloth of some kind to dry a bit more...a step I did not do and I think made it harder to get the seed out because some of the heads were still damp making it harder to get the seed out.  You could probably use an old cotton pillow case if you wanted to for this and hang it up in a drafty location where it wouldn't get wet to completely dry.

Oh yeah...I almost forgot.  While I was cutting the stems I found these little guys feasting on the leaves.  They weren't bothering the seed heads so I left them alone until I was ready to cut the side branches off the main stem.
 
The only ick factor in this whole process for me really was accidentally smashing one or two during this process.  Some were really tiny so keep your eyes peeled for them during the seed cleaning process too.
The birds love these larvae so if you have a feeder that gets good traffic just put the in it and stand back.


Once the stems were dry I took them a couple at a time and rubbed them between my hands, rolling them back and forth and rubbing the flowerheads with my fingers to dislodge the seed if it was being stubborn.  Like I said...it takes a bit of patience...and a bit persistence sometimes too.  The seeds sometimes do not release readily so the rubbing and pinching of the heads helps in this process.  There  are a small amount that fall off naturally so if you only wanted a few seeds you could just shake the heads over a sheet or pan.  I'm greedy when it comes to seeds as I like to have seed to share.  That is in part why I like to take the time and I also enjoy the process.  Peaceable work with profitable rewards is always a good thing.

The stuff you don't want in your seeds.
The end result of all the rubbing is a pile of part seeds and part plant material which then need to be separated out.  My favorite tools for this process are those wire kitchen strainers and a baking pan or small jelly roll pan. 
Kitchen strainers are a great tool for separating seed from plant material.  Hold your free hand at one side of the strainer and tap the strainer gently against your palm like you would a tambourine.


For the lettuce seed I used my larger colander sized wire strainer and then a smaller, finer meshed one with a handle on it.  Be sure to start with the larger holed strainer first and go down to the finer after.  You want the seed to be able to fall through the screen mesh so be sure you don't use too fine of a strainer.  If plant material falls through (which it almost always does) don't get excited, there are a couple more steps before we're done here.


Plant material that made it through the strainer.
Here is what you will have after you have strained the seed.  (Note: Not all lettuce seed is white, some is black)  This Bijou lettuce made it easier to distinguish the plant material from the seed as it was purple when dried.  Notice that there is also a bit of that fuzz left in the mix too.  To remove this you need to winnow the seed which will remove some of this unwanted material

Winnowing is basically letting the breeze carry the lighter plant material away from the seed.  You take the seed and slowly dribble it into the container letting the breeze do all the work. In order to not lose some of your seed during this process make sure to have a large enough container to catch the seed in and be sure the breeze is not too strong.  For a catch container I recommend using one of the larger plastic tote storage containers or you could do if over a large piece of cloth like a table cloth or sheet.  If you only need a few seeds saved you can use a 9x13 pan like I did here and it works pretty well. If you don't have a breeze make one yourself by using a fan or blow across the seeds instead.  Take care to see that your seed is not being blown away in this process.

After the winnowing there was some heavier material still mixed with the seed.  To separate it out I just held the pan at an angle and tapped it or shook it gently while stirring the seeds to release the unwanted material from the crowd of seeds.  The seeds will stick (because they are flat) and not roll while the other material will be rolling downhill and collecting along the side of the pan making it easy to remove.  This is probably the most time consuming part of the whole process.  Now I have to confess I get a little ODC here and want to save "all" the seed possible and will spend way too much time and effort at times to be sure I don't lose any seed.  Thankfully I didn't do that this year and the winnowings went into the compost heap.

Once the seed is clean (relative term here as we don't have those fancy mechanical cleaning machines that really get it clean) set them out on a coffee filter to dry them further which will help them to not mold in storage.
Sunflower seed gift envelopes I created

You can store them in paper envelopes (try making your own) or in jars.  I don't recommend ziploc bags as the seed sticks to the side of the bags, foil pouches work too.  Those little envelopes they use for stamp collecting work really well too.  Personally I have found coin envelopes to be really handy to use.  You can get them at local office supply stores like Office Depot or Staples.  Whatever you store them in be sure there are no places the seed can escape from like those unglued corners of envelopes.

Next I store the seed in a cool, dark, dry place to ensure they stay viable (alive).  In my propagation class at college we were taught that 13% humidity and below 40 F is good.  I just store my seeds in a box and tuck it on the floor in our office where it is cooler.  That works nicely since I don't have room in my refrigerator or freezer where some folks store there seed.  TIP:  You can place a couple of those desiccant pouches that come inside shoe boxes into your seed box to help keep them dry while in storage. 

So have fun gathering.  I'll post some seed packet ideas soon.

Copyright © 2010 by Patty Hicks

All rights reserved. No part of this blog may be reproduced or transmitted in any form or by any means, electronic or mechanical, including printing, recording or by any information storage and retrieval system without written permission from the author, except for the inclusion of brief quotations in a review. All reviews must include author's name and a link back to this blog.

Sunday, August 1, 2010

Anatomy of a Garden Box

Boxed gardens full of yummy beauty
We have four large raised boxes my husband built in our back yard so we could grow vegetables beneath our fir trees.  The boxes became a necessity due to the constant battle between the trees and our veggie garden for water rights and nutrients.  If you want a lesson in futility just try to garden under fir trees.  No wait, don't.

People don't realize how much water trees drink.  The numbers I heard were somewhere around 500 to 600 gallons a day per fir tree and we have three of them in our back yard.   I decided that either we were going to stop gardening back there completely or we needed raised beds. Well, actually I had thrown up my hands to the idea of gardening back there at all in part because of the trees but added to that was the fact that we got bad soil mix twice from two different sources.  Nothing seemed to be going right and it was so hard and shouldn't have been.  Ugh.

Our boxes are made of recycled 2"x10" lumber, fir to be exact and for $50 it was a steal even though we knew it would last only a few years.  It's already dilapidating after only three years and probably next year may need replacing, but still for the price was worth it.  Next time I'm hoping to be able to afford cedar or even composite decking. Both are somewhat expensive but worth the investment as they last a lot longer than fir.  Composit decking is nearly indestructible when it comes to the elements but is much more flexible than regular wood and needs more support along the sides.  The composite doesn't warp either which is great and comes in assorted colors, another benefit if you want that sort of thing.

Wood has a tendency to warp when it gets wet and dries which can cause corners to separate even though they are screwed together into a 2x4.  We had this problem and not wanting to have to buy expensive metal brackets we poked around a local home improvement store for another solution.  I just love hardware/home improvement stores, there are so many ideas to be had there.
Note the corner below the cat (Boomer)

We like inexpensive a lot around here and what we found costs much less than those fancy metal brackets.  They are called mending plates and are normally used to hold trusses together.  Boy oh boy they work slick on the corners of these boxes.  Don't waste your money on brackets unless you are picky about how things look.  Mending plates are less than a dollar each (I think we paid just over fifty cents each for ours).  The hubby just lined them up so he could pound the teeth of one end on one side of the corner, bent the plate around and pounding it into the opposite side and that was it...not even any screws or nails!

Warping can also cause the boards to wow along the sides.  When this happened we just pulled back the soil and screwed in a small section of 1" by 2" wood to pull them back into place.  I recommend taking an ounce of prevention and putting in extra support inside along the sides before you fill the boxes, its a lot less work.

A couple days ago we purchased new compost for one of our boxes which had laid fallow all summer because the soil or what we thought was good three-way mix, turned out to be nothing more than 90% bark mulch with a bit of sand and just enough composted manure to get things to sort of grow in it.  I blame myself in part for this error as I sent my husband, who has little knowledge of soil and soil mixes, off by himself to purchase it and was not there to assess the product we were paying good money for.  That was an expensive mistake...a $300 dollar mistake actually. (We have four 12'x4'x19" boxes and it takes lot of soil to fill then.)  My advise to you would be to be sure and do your homework before you buy and don't send someone else to pick it up unless you have seen it first.  You will save yourself a lot of grief and money if you do.

Gotta love a good truck and a strong man.
Last year we pulled that bad mix out of the first three boxes and did various versions to try and save money.  I won't go into details here but I think we actually have made every mistake in the book when it comes to soil in these boxes. We still don't have it right. Lord have mercy and I hope this compost will be the fix for our raised bed sorrows.

So back to box...  My husband had decided he was going put the beautiful compost we had just purchased in the bottom half of the box since we had to take most all the old stuff out anyway.  I blanched and put my foot down.  No way were we going to do that.  Those seeds I was planning on sowing didn't have a snowball's chance in a heat wave to survive if we did and I told him no we were not and why.  He did the hubby harumph still arguing his way was best until he saw all of the big chunks of wood still in the old soil mix after three years.  (I tried to tell him it was nothing but wood.)  That's all it took to change his mind real fast.

So we dug all but just a little bit of the woody stuff out of the bottom, yanked out the invading roots that had grown up through the hardware cloth we had put down in the bottom of the box to keep moles out and then spread out the beautiful rich compost on top.  YES!  Finally, several inches of good soil to grow in!  I could have danced the happy dance if I hadn't been so tired.  But planting would have to wait for another day.

Not taking nothing for granted the newly filled box was topped with something to keep the neighborhood cats from using the fresh soil as a litter box, snow fencing.  You know...people use all kinds of things to keep cats out of the garden.  little sticks poked into the soil, which I've never really understood why that would work unless they spaced then really really close together and that is way too labor intensive for me.  Who wants to work that hard?   Cayenne pepper is supposed to work but when I tried the cats didn't seem to mind it much at all and dug up the area like it wasn't there.  Then there are those sprays, nope, they didn't work either.

In thinking about it I pretty much decided in order to keep them from digging in the beds the area had to be completely covered until the plants were large enough to hold their own.  That's when I began using chicken wire, those plastic mesh flats plants come in, hardware cloth and piled up branches but found the snow fencing to be my favorite.  Its very flexible and light weight can be cut to size without becoming dangerous.  Chicken wire and hardware cloth can be dangerous to handle because the cut ends are very sharp and can wound you pretty good if you are not careful.  So if that's what you want to try just take note and be sure to have a box of band-aids on hand just in case.  There is only one other thing I think would work better and make covering and uncovering the beds easier and that is to cut the snow fence into 4' sections. Gee, I won't have to use the wire at all anymore and will save on medical supplies too. Yippee!  It will also make it easier to cover smaller sections.  That will come in handy as the crops begin to grow.  Oh and you can cut the plastic fence with regular scissors, another great benefit.


String, sticks, seeds and scissor...oh and plant tags

Saturday I got up all energized...it was planting day!  Grabbing my seed list, some graph paper and a pencil I headed out to the box and lined out where I wanted things to be in the box.  Back to the house for a double check of my seed stock and draw up a clear plan I could actually read.  Once that was done I took my scissors, plant tags and marking pen, stakes and seeds and went to work.
 

My awesome ruler.
 Oh before I go any further I have to share one more very cool thing...my four foot metal ruler!  Its the coolest thing ever.  It fits the width of our beds perfectly and I can use the edge to make the seed furrows. I had been looking high and low for something I didn't have to make and then there at a local thrift store was my ruler!  Just wide enough to lay in the bed, metal so it will last forever, measurements on either side for convenience.


I cannot believe sowing the garden takes so long.  My husband can't believe it either but then he's not doing the planning and planting.  I had told a friend it would take about an hour and a half. (ha ha ha)  Maybe its just that I don't move as fast as I used to but I swear I was out there for five hours at least...well maybe four.  I suppose if I was the sort that didn't care how it was going to look and more about production it might go faster...but nope, not me, I have to have it look pretty too.  No wait, gorgeous!  Oh and I did do some other things but mostly I just worked on this one bed.  Go figure.
Tags are laid on top of the ground until seeds are sown to help keep track of what has been done and what needs doing.

So I lined out the rows...er design and set the stakes and string, put out the plant tags in their prospective locations, double checked my drawing and sowed the seeds.  I am not a fan of sowing seeds as its bending down kind of work, even in a raised bed like mine, and my back complains whenever I do it.  But the reward is worth the little bit of discomfort and the thought of the fresh greens this fall and winter are already making me hungry for soups made with kale and collards and oh yeah...baby parsnips.  I was late getting those in...but baby is good too.  Now to keep it all watered and wait...and dream of future harvests.

Happy Gardening!

Copyright © 2010 by Patty Hicks

All rights reserved. No part of this blog may be reproduced or transmitted in any form or by any means, electronic or mechanical, including printing, recording or by any information storage and retrieval system without written permission from the author, except for the inclusion of brief quotations in a review. All reviews must include author's name and a link back to this blog.