Showing posts with label preserving fruit. Show all posts

Friday, November 25, 2011

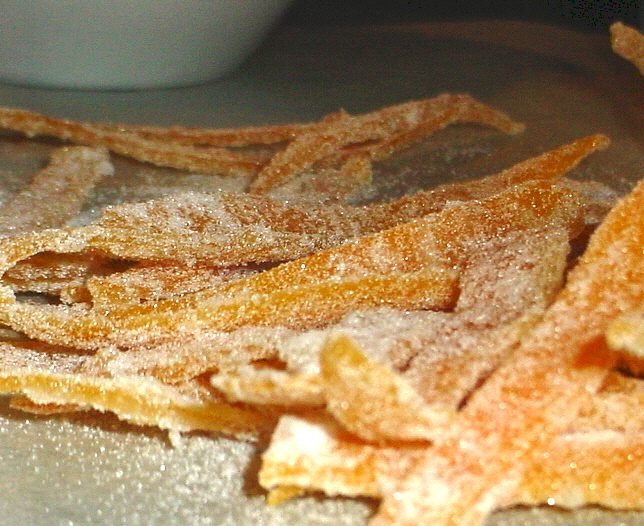
Candied Citrus Peel and Orange Lavender Syrup

Candied Orange Peel

Here is a great gift idea for the foodie in your life; candied citrus peel.  This confection is quite simple to make, turning something that often ends up in the compost into a sparkling culinary delight that is wonderful to use baking or to nibble on.

When choosing fruit get fruit with thicker skin that is heavy for its size.  For this recipe I used organic oranges which I washed before processing.  (Any citrus fruit works; lemon, lime, grapefruit, tangerines, etc.)

Don't toss that peel, make candy!

Using a citrus peeler score the peel to form eight strips.  I found scoring the peel into eight strips works very well as they peel off the fruit easily without tearing and it was the best size for shaving off the membrane for the same reason.  This process a bit labor intensive but very worth the effort.

Tools that make this easy.
Citrus peeler and a sharp knife

To remove the membrane, lay the strips of peel, membrane side up.  Holding down one end, lay the knife blade down sideways and run it between the membrane and zest or outer layer.  This is why you need the sharp knife.  Take your time or you will tear the strips. 

By the way, I was making this after the huge task of making our Thanksgiving meal and found this portion of the process very quieting and refreshing to my soul...its funny how that can happen.


The white membrane is bitter so I cut it away.

Place the citrus peel in a medium sauce pan with enough water to cover.  Heat to a strong simmer and cook for 10 minutes to blanch the peel.  Drain off the water. 

Some recipes called for repeating the blanching process but these recipes also did not remove the bitter membrane and it seemed to be only to mitigate the bitterness.  Since I had cut away the membrane I chose not too repeat it and it worked fine.


Add to the peelings in the pan, 1 cup water and 1 cup sugar.  Simmer for 1 HOUR. You MUST watch the pan and stir it occasionally, scrapping the edges.  You want to avoid the pan simmering dry and the sugar from burning along the edges of the pan.

The peels will become transparent as they cook and after an hour there should still be some liquid in the pan, with sugar crusting along the sides some.  One recipe I read said to only cook until the peel was transparent but I found that if you cook them longer the sugar coats the peel better.

As pretty as glistening stained glass
only edible too!

Drain the syrup off the fruit and line them out on a lightly oiled backing cooling rack and dusted the tops of the citrus peel with Baker's Sugar and let them dry for several hours uncovered.  Instead of straining the liquid off, which was now infused with orange essence, I used small tongs and lifted the peels out, saving the syrup to make Lavender Orange Syrup (recipe below).

Place dried pieces in a bowl of Baker's Sugar
Stir to coat completely
Cover work surface with parchement or wax paper
Place dusted peel on the paper to catch excess sugar
Just too pretty to hide away.

It's best to keep the batches small so you have more control over the final product and also to avoid burning the sugar.  Again, take your time, enjoy the process.  For me this time was a great time to get some small tasks around the kitchen done, like cleaning out a drawer and loading the dishwasher.

As promised here is the Lavender Orange Syrup recipe.  Stir in 1 tablespoon lavender flowers into the remaining liquid and put it back on the heat, stirring often until it began to boil.  Once it boils remove it immediately and set it aside to cool for about 10 minutes and then strain it through a fine wire mesh sieve for later use in tea or on ice cream.

ENJOY!

Copyright © 2011 by Patty Hicks
All rights reserved. No part of this blog may be reproduced or transmitted in any form or by any means, electronic or mechanical, including printing, recording or by any information storage and retrieval system without written permission from the author, except for the inclusion of brief quotations in a review. All reviews must include author's name and a link back to this blog.

Wednesday, October 26, 2011

Quince Candy 101...oops

Quince (Cydonia oblonga 'Van Damen') in my husband's large mits

Looking for the perfect quince candy recipe?  So am I. This post was supposed to be about quince candy that was a bite of heaven but this recipe turned out more like chunky jam instead.  I made some once before but could not for the life of me find the recipe I used (its probably hiding someplace safe) so I had to find a new one online.  So why am I writing this blog at all you ask…because evaluating what didn’t work and tweaking the original recipe will help us discover what will work. 

What is the big deal about quince candy anyway?  For starters it is said to be equivalent to Turkish Delight when made properly but for me, finding that recipe has become a good puzzle and I love the reward of solving puzzles.  Besides if we get this one right there will be one stellar recipe for quince candy out there that everyone can enjoy!

First off let me say that making quince candy does take some patience but it is worth it and is really quite pretty as well as an unusual and delightful confection...well normally it is.  So here is the recipe I followed.

Lets get started!
PART 1
First I peeled, cored and dice enough fruit to fill my Dutch oven about three quarters full. The recipe I used didn’t specify what amount of raw fruit was to be used so I guess and would recommend 10 cups.  If you have more than you need you can always sweeten it and use it on waffles, (we love quince sauce on waffles).

This is simmering too hard, thus the excess foaming of the fruit.

I poured in enough water in to cover the fruit well and added 1 ½ tbs. fresh lemon juice. (Lemon juice helps to keep the fruit from turning brown.) I covered the pot and set it on medium high heat until it began to simmer nicely and then took the lid off and turned the heat to medium low so it simmers slowly until the fruit was tender.

Save the juice and reduce down for later use

The original recipe said it would take 20 to 30 minutes…I’m guessing the author of the recipe I was using cut their fruit into large chunks and I had cut mine into 1” diced bits which cooked twice as fast and were actually starting to fall apart.

Next I drained the fruit.  Because the fruit was cooked past being tender I had to be sure the strainer I used to drain the fruit didn’t allow for the smashed bits to run on through with the juice when it was strained.  A medium sized wire strainer worked great for this with only the tiniest bit of fruit getting through.

PART 2
I weighed the drained fruit, which came to 4 pounds…exactly what the recipe called for (got lucky on that one) putting the drained fruit into the pot.  I added an equal weight of sugar to the pot as the recipe called for, added 2 tablespoons of fresh lemon juice and stirred it to blend. (Equivalents for cups are noted below for your convenience.)

Do not hurry this pot or you'll scorch the sugar

I set the heat to medium low and sat watch over the pan, stirring frequently too avoid burning the sugar for 2 ½ hours until the fruit was thick enough that the spoon left a visible trench behind it when run through the middle. (Again as the recipe directed)

The natural color of quince when cooked long enough.
Hot fruit into the pan and spread evenly
Run your hand over the paper to smooth the candy

The fruit was then poured onto a large jellyroll pan lined with parchment paper, spread evenly to about ½’ thick and covered on top with a second sheet of parchment and left to dry 36 hours.  The recipe called for only 24 hours but it seemed too moist to me so I gave it a little extra drying time.  My pan was a bit larger than needed.

Good morning my sweetness, you look so lovely.

This morning I lifted the paper and was not very pleased with how moist and sticky the fruit was.  I could have left it to dry on its own but since I don’t have anywhere to stash a large baking sheet for a week, I decided to try using my oven set at 200 degrees and dry it like fruit leather.  It was in the oven for about an hour. 

Hmmm...chunky candy it's not supposed to be.

I admit I was impatient and this didn’t work very well either as the edges dried only a little bit but the center was still too moist.  I think adding some gelatin to the fruit would really have helped in this recipe so one could actually pick it up with their fingers but as it stands…I recommend a spoon.  I will try the gelatin and the methods I recommend in the notes below in the 102 version so stay tuned.

NOTES:
  • Smaller pieces take less time to cook than larger ones.
  • Fruit is chunky so I recommend processing fruit in a food processor before returning it to the pan or the candy will come out chunky as well.  
  • Quince fruit is a bit grainy in texture so I am looking for a way to reduce this character and still keep the valuable pulp in the candy.
  • Be sure the parchment is up on the sides of the pan so you can extract the candy without it sticking to the sides or bottom
  • Weight to cups equivalents for both fruit and sugar: 8 cups = 4 pounds or 2 cups = 1 pound. (Makes it really easy if you want to half or quarter the recipe)
  • Save the water you drain off of the fruit and use it for a spiced drink or cook it down to capture the pectin which quince are famous for.
Enjoy!


Copyright © 2011 by Patty Hicks
All rights reserved. No part of this blog may be reproduced or transmitted in any form or by any means, electronic or mechanical, including printing, recording or by any information storage and retrieval system without written permission from the author, except for the inclusion of brief quotations in a review. All reviews must include author's name and a link back to this blog.