Showing posts with label seed sowing. Show all posts

Friday, July 19, 2013

Grocery Store Discoveries: Unusual Garden Seed Sources


Do you only buy garden seed the traditional way, or do you look for seed you can sow in more unusual places...like the grocery isles, bulk bins, ethnic markets and feed stores?  If you only buy seeds the traditional way you're missing out.  Not only can you save money by looking elsewhere, but it can be a real adventure.  Beware though, it is a teensy bit addictive.

Clues on the packaging.

The other day I snatched up a great deal on an 8oz bag of Bob's Red Mill Natural Foods "Premium Poppy Seed" for $2.00 at a local liquidation market.  Yes you can find seeds there too.  Anyway, Bob's 8oz bags go for $3.39 each online, plus shipping.  Even at that price these seeds are a steal compared to buying the stuff in those little bottles for twice that price or seeds a single seed packet which would be at least that much if not more.  See, I told you it was a great deal.  And it ends up my bag of seed is about 1.5 cups worth which is a ton-o-seed but we love "poppy-seed-anything" around here so it won't go to waste.  If I told you my first thought when I spotted it was cooking I'd be lying though.  I snatched up these seeds mainly to see if they were viable seed I could plant.  Yes, that's right...I wanted to plant them. 

To find this out I would need to test the seed to see if it was alive, or in gardening terms "viable".  To do this I sprinkled a few seeds between two layers of moistened paper towel, then wrapped it in plastic wrap and stuck it on top of the freezer where it's nice a warm and waited a couple of days.

Sqweeee!  Look at 'em...they're sprouting!

This morning when I checked on of my little science project and found the seed was indeed viable (yippee!).   This is day three and there are better than 50% of them sprouted, with more on the way.  That means I can sow them and have my own crop beginning next summer.

Testing seed for freshness is also helpful if you are using them for cooking as the freshness seeds can effect their flavor, or as is the case with dry beans, determine whether we should even use them at all.  Dead dry beans do not absorb water and you can break a tooth on those puppies.  Other seeds used for oils can go rancid with age so if it doesn't sprout it could be dead which could also mean rancid and save you from ruining that lovely meal you are planning to use them in. Freshness dates are your only recourse with those.

So the general rule when it comes to viability is the lower percentage of seeds that germinate, the less fresh the seed is.  You can test any seed that has not been pasteurized with heat which would kill the germination.   Oh and one more thing...this is a great science project for the kiddos too. Get your kids hooked on this and you may find them scouring the stores for seeds to sow too.  I'm not trying to be an enabler or anything.

Poppy seeds are only one of the many types of seed you will discover that you can grow.  There are many dry (horticultural) beans, flax seed, wheat and other grains, chia (these are really yummy) and much more.    I wanted to start with Poppies because not only the seeds, but the pods for crafting and before that the beautiful flowers with soft grey/green foliage and I figured something in this mix of things might encourage you to give it a try.

Well, it seems I now have enough poppy seeds in that jar to sow a whole field of poppies so I guess I'll have to get busy and bake something.  Lavender lemon poppy seed bread or maybe some short bread cookies sound pretty good don't you think?.  Stay tuned, I'll be posting a recipe next.

Happy Gardening!


Copyright © 2013 by Patty Hicks
All rights reserved. No part of this blog may be reproduced or transmitted in any form or by any means, electronic or mechanical, including printing, recording or by any information storage and retrieval system without written permission from the author, except for the inclusion of brief quotations in a review. All reviews must include author's name and a link back to this blog.

Saturday, February 16, 2013

2013 Challenge: To Not Sew a Single Seed

Catalogs became the voice of the devil to me

What would happen to my life if I didn't sew a single seed in my garden?  I began wondering about this a few years ago when pain levels in my back began making it increasingly difficult to garden and have decided actually do it and see what will happen.  That may not sound hard to some of you, but for someone like me who has passionately gardened for decades, I am finding it at times to be very challenging.

For instance, those seed catalogs that I so love to see come in the mail have turned into the voice of the devil to me.  No more fun shopping those gorgeous photos of luscious lettuces and tempting tomatoes.   I wouldn't you know it, I opened my mailbox the day after making this decision and out popped two of my very favorite seed catalogs on the same day. "NO, NO, NO! This is not fair!" I shouted waving them in the air so God could see them and everyone else too, laughing at the irony of it all.  My neighbors must think I am a loon sometimes.

When the seed packets were put out at our local grocery store I just had to peek.  Just once you know...take a little peek to see if there was anything new this year which I realized was really seeing what I was going to be missing and a really bad idea too by the way.  Standing there in the isle in front of God and everybody I suddenly realized  I could not buy a single one of them even if I wanted to!  Resisting the temptation to envision gorgeous lush Mascara lettuce plants or killer Laciniato kale or beautiful Bull's Blood beets I could grow was awful and hard and sad.  The reality of it all, even though I knew it was good for me was harder than I expected and my eyes welled up with tears.  Suddenly I realized I had better get away from the racks before I lost it completely.

This whole exercise in letting go of growing from seed is probably good for me I keep telling myself.  Not probably, it is actually very good for me and for two reasons.  First, because I have chronic back pain, 24/7 rob your life kind of chronic pain, back pain that has gotten so bad that it is basically crippled me.  I can't sew seeds if I cannot take care of the plants and to take care of the plants I need to be able to shovel, which I can't do, and I can't kneel or bend to weed, and I absolutely cannot lug a hose...you get the picture.  (I still secretly dream of digging...I miss digging more than any others work in the garden.)  I know I need to be careful with what I do and that means the gardening has to go.  This pain was the impetus for my taking on this challenge which also has made it easier to accept.  Hopefully it will be a part of me sticking to it too.  Harder is convincing other people that gardening is not something I should be doing right now.

Some of you are probably wondering why I don't get my husband to garden. Let me stop you right there before you attempt to voice that thought...No! No! No!  That man, who I love dearly, is best when he just fixes things and stays out of the garden!  We all have things we just cannot do very well and his is gardening so don't even go there!  He proved that long ago when I trusted him to help water the veggie garden while I was at a family reunion.  I demonstrated what needed done and recommended what not to do and why...he did the later.  I got home to find half the tomato plants had died for lack of water because he thought he set up this smart watering system, the one I warned him not to.  I just cannot trust the man because he is always trying to do things by "sciencing them out" which almost always fails. (ugh...Sorry Honey...I love ya but you are no gardener.) 

At this point I have not been able to take care of the garden as it should be for three years and I am more than ready to let it go.   It has become a bit of a nightmare and needs a total makeover, as in an "extreme garden makeover".  Outside of a miracle that will not be happening by my hand unless I gain my health back and even then the desire to garden like I used to just isn't there anymore.

God has been trying to get it through my thick scull that there is something else He wants me do besides gardening which honestly was my whole life for several years.  I kept getting nudges to use other gifts and talents, like writing and art...not that I am incredibly artistic but God has this crazy way of taking what we have and making it wonderful so I am game.  But what should I do?  That was and is the big question for me right now.  There are enough options that it is making this pretty exciting actually. 

There are a lot of friends out there who know only that I know a lot about plants and little else about me.  It has been difficult for them to wrap their minds around the idea of me not gardening because it was my identity for so long.  To them I have always been "Patty the Plant Lady" and gardening is what I do!  I am Patty who talks in Latin and can grow anything from cuttings and Patty, the lady everyone goes to with their plant questions.  Yes, that WAS me, and I am still that person...just not like I used to be, I am becoming more.

Gardening and plants had taken up so much of my life I think I got lost in the process; I had become a "gardenaholic" as we gardeners jokingly say.  But honestly I think I really was addicted to it.  I used it as an escape, as my identity and I buried myself beneath it like a drunk hides in his bottle. The truer me was trapped beneath it all, my desires laying dormant, waiting to grow, to bloom the way God intended for me too from the beginning. 

This has been confirmed to me as since having to let go of being "the gardener" I have seen an increased desire to grow in other areas that were not as well cultivated as my plant nerd self was.  Desires to do things I used to do and some things I've never done before have been sprouting up like spring seedlings.  It's time for those other things to be brought forward and I am really excited by some of the possibilities.

So by laying down my trowel, the shovel and hoe, giving away all the seeds of temptation I have stored up in my pretty little heart and head, I am now opening my hands and my heart to what God has next.  I am getting ready for my next assignment and gaining better understanding of who this me is that God has designed so wonderfully.  Preparing myself in mind and body, through studying scriptures, reading books, working hard on getting my back health restored...it is me taking this journey hand in hand with my God, one step at a time.  It will be interesting to see where it takes me and I look forward to what I will discover.  Stay tuned!

Jeremiah 29:11
For I know the plans I have for you, declares the Lord, plant for welfare and not for evil, to give you a future and a hope.


Copyright © 2013 by Patty Hicks

All rights reserved. No part of this blog may be reproduced or transmitted in any form or by any means, electronic or mechanical, including printing, recording or by any information storage and retrieval system without written permission from the author, except for the inclusion of brief quotations in a review. All reviews must include author's name and a link back to this blog.

Friday, March 23, 2012

DIY Paper Mache Seedling Pots


What is easy with a capitol E, messy with a capitol M, and fun with a capitol F?  Making paper mache seedling pots!  These would be a great project for the kiddos.  Here's what you need to make them...

The kitchen blender
The kitchen sink (or other large container)
Warm and cold water
Newspaper torn into bits
Wire colander or screen
All purpose flour
2 large muffin tins or other containers to use as molds
Latex or other gloves

**Put on your gloves or your hands will be black with ink.**  (I found this out the hard way)

I began with strips and then tore them smaller

Tear up the newspaper into the sink/bowl.  (Don't use glossy ads.)

Paper absorbs warm water faster than cold

Pour warm water over the paper strips and let it sit for a couple minutes.  The strips tear into bits easier when they are wet.

Not exactly a smoothy

NOTE: You will need to make up two batches of wet pulp to have enough pulp to fill both muffin tins.

Fill the blender about 1/3 of the way with the wet paper bits (don't pack them down).  Add COLD water to about 2/3 full. Pulse to blend.  (By the way...the lid will pop off the blender if you use warm water.)  You will probably have to stir it a time or two during this process to get it to blend properly and if it seems too thick just add more water.  Blend until no paper bits are visible.

The sink would be easier than this bowl

Place the wire screen colander in the sink and pour the paper pulp onto it letting it drain.  I find tipping the colander from side to side helps speed up this process.

It will begin looking more like clay when it is drained some.  Now you can take it by the handful and gently squeeze out excess water...but not too dry as you still need to add the flour.  The original recipe I found through Pinterest did not call for adding flour but every paper mache recipe I have ever seen uses it so I figured I could just mix it into the pulp since I was not gluing down strips of paper. 


Next place the double batch of processed and drained paper into a bowl and sprinkle 1/2 cup flour over the top.  Knead the flour into the pulp until well blended.  You have just made paper mache clay. 

If it seems too juicy at this point just take it by the handful and squeeze out some of the water over the sink until it is not so drippy.  If its too dry add water a little at a time and mix with your hands.  Remember that the wetter this clay is the longer it will take to dry.

Bottom and sides of even thickness

Fill each muffin tin 1/2 full.  Press it into the tin starting from the center of each cup and working outward.  Try to avoid thin spots.  I found using the back of my fingers worked really well for molding the sides.

A heat vent would work great too

Find a warm spot to set the filled muffin tins on and let them set for 24 hours.  When they are about half dry poke a small drain hole in the bottom of each one.  If you don't have a warm spot like I do you can let them dry on the counter and finish them up in the oven at 220 F to finish drying them.  (Time needed depends on how damp they are.)

Didn't get this one pushed into the corners tight but it is fine

When they are completely dry the pots should pop right out of the pan.  If they are not they will stick and could tear if you try to dig them out so it pays to be patient.

Pert near perfect pot I'd say.

As I was extracting my new little paper pots this morning I noticed one thing I probably should tell you about.  These smell a bit like a really old dog...or maybe old dirty socks.


Where is the air freshener?

Not that the odor it will make the whole house reek or anything but they are rather...um, fragrant.  So if you are not planning on using them right away I would storing them where they won't perfume the room.  The smell seems to dissipate some with time too as I noticed they were not as strong the day after.

Have fun!

Wednesday, May 4, 2011

Spring is Springin'

Lord help me, I think I’m gonna have to squeal like a schoolgirl I’m so happy!  Spring is springin’ finally!!!  I can tell because the seeds say it all and I am never more excited about any garden chore results than with the emergence of my little baby plants.  Spring is springin’….

In our sunny kitchen window
Hope springs forth quickly with cucumber

In my vegetable garden
Stirring up hope with carrot babies
 
At the front porch
Lettuce be hopeful


Out front on the walkway
Ain't nothin in the world like homegrown tomatoes


So if you need to beat the doldrums of lingering cold weather try sowing some seeds of your own and maybe, just maybe, Spring will spring up at your home too.

Tuesday, March 22, 2011

Tomatoes In Milk Jugs? Seriously?

I hate paying the retail prices for plants I can grow myself don't you?  What was that you say?  You don't know how to grow plants so you always buy your tomatoes?  Well I hope this post will change your mind.  You don't need a greenhouse, you don't need lights or heating mats or other costly stuff to grow your own tomatoes.  If you have empty plastic milk jugs, some duct tape and some potting soil...oh and the seeds of course, you can grow tomatoes at yourself.

First the seeds....here are my tomato varieties this year...Gardeners Delight Cherry Tomatoes, Ananas Noire, Cuore Di Bue and Japanese Black Trifele...oh and Pineapple ground cherries.  I am total a sucker for yummy sounding descriptions and beautiful rich colored photos I have a hard time settling on varieties because they always come out with new ones.  I hope this works...now where are those milk jugs.  Oh and if something goes wrong and this doesn't you'll get the advantage of learning from my experience without any of the pain.

Seed packets at the ready.

Backstory:  When I first heard about this method of growing tomatoes from my good friends Barb and Don who live across the Columbia River and at a higher elevation from us I was very curious and actually sort of skeptical.  They've done this for years and told me it produces the stalkiest, hardiest plants they have ever had.  I was like the rest of us who have been used to traditional greenhouse grown tomatoes or those grown in the kitchen window with the lanky spindly stems and was a little suspicious but last year gave it a try for the first time.  It didn't make much sense to me until I remembered what I had read in "Four Season's Harvest" by Eliott Coleman about how they grew peppers and remembered what I had seen in the greenhouses while working for a plant grower.

A pepper plant that does not have some breeze blowing across its will have a weak stem.  Wow...just like our muscles need exercise!  That was so cool!  The cooler weather keeps the plant from growing too quickly too and makes the cells in the plant tougher and less like the skin of a baby which is exactly what those plants grown in green houses are and why they need to be hardened off.  They are a bunch of greenhouse coddled babies.

I am not one who enjoys coddling my garden so I was seriously hooked into trying this method out.  Last year I did it for the first time with great success.  Even the cooler than normal summer didn't stop my super duper tomatoes and they all grew very well.  Those stems were really buff!  I'd never seen stems that strong.

Buff Baby!  Lookin' good!

Instructions:  Grab those milk jugs and follow along.

I use a good sharp serrated knife instead of a hot knife...no fumes.

Cut triangular holes in each of the three shoulders of the jug and then cut 4 of the same in the bottom for drainage.
The next step is to cut around the middle so you have a way to get those plants out...OOPS!  What have a done!?!
 
OOPSIE!   I cut it all the way off.

Well...thank God for duct tape is all I can say.

A note to self...Do not cut!

That's more like it.

After cutting them all I filled the bottoms of each with regular potting soil leaving about 1" space to the top so there was enough room for a top coat of seedling mix that will go over the seeds.

Seedling mix is not as heavy as potting soil and easier for seeds to sprout through.

Seeds sown, containers marked and watered in.

I put a plant tag in each container with the variety name on it and then mark on the outside of each container what is inside so I don't have to open them up to see which is which.  Be sure to use a UV stable marker when you do this.

Now its time to close the sides with duct tape.  (The next time I buy a roll of this stuff I'll get it in colors I think...we have enough gray around this time of year.)

Love that duct tape!

So I repaired my boo boo on the one container with duct tape, taped the top and bottoms closed and set them on a large jellyroll pan up on the freezer where the warmth will help germinate the seeds more quickly.

Warm and cozy, now to wait.

Once they start to germinate they get to go outside on the front porch in the sunshine.  The only other thing I'm going to need is one of those clear plastic tubs but that part comes later on. Stay tuned!

Oh and while you are waiting head on over to "Thanks for Today" where they are once again doing the "Gardener's Sustainable Living Project" and enter to win one of several prizes. Gardener's Sustainable Living Project 2011

Saturday, March 19, 2011

Seed Tape Project 101

Have you ever made seed tapes.  They are so handy and a great project to do with children.  But really for me, to be honest here, seed sowing is not one of my favorite garden chores.  Because of this I'm always looking for ways to make this necessary chore quicker and less painful. Part of the reason has to do with a truth that you youngsters will discover sooner than you probably want to which is that the older one gets the further away that that ground down there is.  Even with raised beds it can get wearing on the body...all that bending over the beds to be sure all the seeds are sown just right.

Carrot seeds are not very fun to sow because they are so stinkin' small.
Some seeds are rediculously hard to sow without getting way too many in the hole...like carrot seed.  It is teensie weensie and just when you think you are only sticking a couple of seeds in that hole..oops...there go five!  Ugh...I hate wasting seed.  Seed tapes are a great away to solve both of these problems at once.  Oh what are seed tapes you ask?  Keep reading and I'll show you...their pretty darn cool!

You will need:
  • Flour and water...to make a paste like thick paint
  • A paint brush
  • Strips of toilet paper(TP) or black and white newspaper in measured lengths (mine are 2' and 4' long)
  • A yard stick or ruler (Mine is a 4' long metal ruler I found at a thrift store)
  • Tweezers (needle point type work best)
  • Seeds...carrots, lettuce or other smaller seeds are good for this method...even flower seeds!
  • A place work and a place to lay the strips to dry.

First blend the flour and water paste together until most of the lumps are out of it.

Gee, lets make paper mache'!

Lay out your strips of paper next to the ruler.

You have got to get one of these rulers!  They are so cool!
Fold the TP in half before adding paste (you don't need to do this with newspaper)

Just a thin layer will do

With the paint brush paint the flour paste down the center of the paper. We're not making pancakes here so be sure you don't slobber the paste on the paper too thick.  A nice even layer to hold the folded sides of the paper together when you press them down over the seed.  

Spacing seeds every 2 inches.

Place seeds at proper spacing on the pasted portion of the paper using the ruler as your guide

Folding again and pressing over the seeds to stick them in place.

Once all your seeds are placed on the strip of paper, fold it over length wise and gently press down to seal the sides together.

Once you have it all pressed down you can set it aside to dry on a countertop or other surface that the damp strips won't harm.

Clothes drying racks...another favorite thing.
A couple of hours after I had finished my seed tapes I needed my dining room table for dinner so I moved them to the clothes rack.  If you want to do this you just need to be sure they are about half dry before hanging them up.  I suppose you could use one of those mesh sweater racks that are designed for flat drying clothes too.

When the strips are completely dry just roll them up and store them until its time to plant them.  Oh don't forget to mark those seed tape rolls so you know what they are or you will forget.  Trust me.

There you have it...how to make seed tapes.

Tuesday, March 8, 2011

Winter Sown Seeds Update

So a few weeks ago I started some vegetable seeds in recycled milk jugs and butter tubs.  Winter sowing is one of those ways gardeners keep from going completely insane when its snowing outside and winter seems like it will never end.  Its a great way to get a nice early start on early season veggies too and save a bundle by growing your own.  I have instructions on how I use the milk jugs in my previous post.

So today it was a spring-like mid 50 degrees kind of day with high clouds and no wind...oh joy!  A perfect day to play outside in the garden.  Me I grabbed my camera to get these photos to share with you on the progress of my veggie babies.

Probably about 10 days to transplant
Endive germination is slower than I had expected.
Bok Choy getting its roots under it.
 These tubs have been outside all but one night when it dipped below 20 degrees.  They were placed on top of our freezer where its a bit warmer to get them to start germinating.  As soon as one seed sprouted, out they all went onto the front porch where they get the sun most all day.

Ruby and Green Streaks Mustard...oh yummy!
This is a little disappointing, nothing up yet. 
The other swiss chard variety doing good
These better grow.  They were pricey seeds.
Dependable collards are doing fabulously
And I found a fly to ID while I was shooting the pictures.
It won't be long and it will be time to sow the tomato seeds in these milk jugs...that is another blog post so stay tuned.

Happy Gardening!


Copyright © 2011 by Patty Hicks
All rights reserved. No part of this blog may be reproduced or transmitted in any form or by any means, electronic or mechanical, including printing, recording or by any information storage and retrieval system without written permission from the author, except for the inclusion of brief quotations in a review. All reviews must include author's name and a link back to this blog.

Wednesday, January 12, 2011

Seed Box Wisdom Part 1

With the arrival of the seed catalogs comes the reminder that its time to sort through the seed stash.  If you are like me you have a lot of seed packets in that stash and over the years have spent endless hours going through them, dreaming, organizing, swapping and etc. As I was going through my box last week I was recounting all the mistakes I've made and realized there are a lot of you who may not have the slightest idea some of the things you may be doing that are possibly damaging your little treasure of seeds and causing failure...I know that was me.  I'm hoping by what I share in this series of posts will help you avoid some common pitfalls and benefit from some ideas that really work.

Organize for better production is key to reaping a good harvest.
#1 - Shopping
Being a wise seed shopper is sometimes a hard thing to do if you love to garden.  How many of you feel like a drunk in a liquor store when it comes to buying seeds and find yourselves sucked into the marketing tactics of seed purveyors?  You are not alone.  (I raise my hand)  Seed companies are masters at getting us to drool over every new or reintroduced variety of seed out there; note those gorgeous photos and well worded descriptions, its their job after all to get us to part with our money for their products.

A small sampling of what comes in the mail.
It seems this is pretty easy to get us to do too because of the simple fact that one seed packet don't cost much and if we fall prey to their tactics we will soon have spent a small fortune.  I figure I've wasted at minimum a couple hundred dollars over the past 15 years and probably much truth be told.  Just think, I could have bought a really nice little fountain with that money or other needed things. These days my rule of thumb is this...I have to have a place to grow it, I have to have a good reason to grow it (food, beauty or utility) and it has to be a good value.  I am notoriously cheap as a gardener after working in the nursery industry, a fact I find ironic...maybe it was just easier to get more stuff that way.  So lets take a look at some tips to help you with your seed stash.

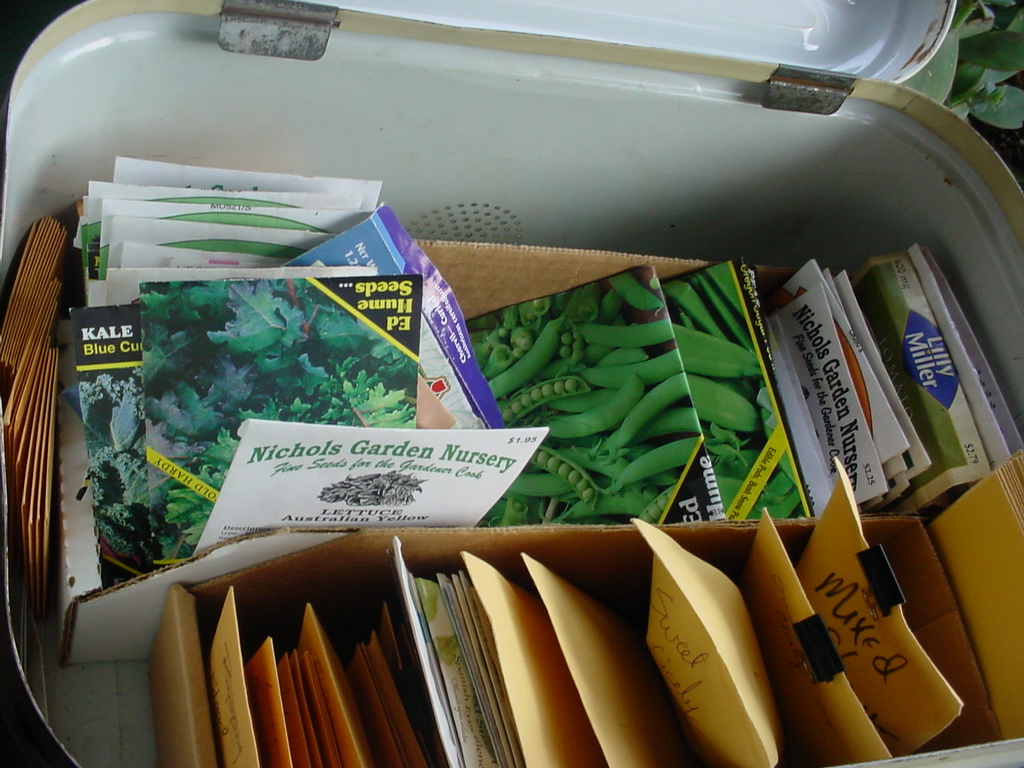
My bread box turned seed box where all my treasured seeds are stored
#2 Where are your seeds?
I know that may sound simple enough for many of you to answer but there are so many people I know who just toss the seeds any old place.  It becomes an important question I think when you consider that seeds cost money you wouldn't stash dollar bills in junk drawers or other odd places.  I'm of the mind that seeds need to be kept in one place and kept in an environment that will ensure their viability for as long as possible otherwise I may as well just flush that cash down the toilet or toss it out the window.  When we buy seeds we are investing our money in the hope of a harvest so make that money go as far as it can.

#3 Know what you have!
How many of you have your seeds organized so you can quickly see what you have?  I'm guessing not many.  I used to hoard seeds and love to collect them from any where I could which left me with two huge boxes of seed packets and a very long list of what was in those boxes.  Needless to say there was no good way for me to keep up with what needed to be sown let alone remember what I had.  It was so exciting getting new varieties every year but honestly, its so much more exciting to me these days to actually reap a harvest from the seeds I have than just be a collector and keeper of the stash like I used to, if you know what I mean.  If you want to take hold of the reigns of your stash you have to make some hard decisions...get rid of what you won't sow and organize the rest so it makes sense and serves you the gardener in your efforts to garden.

Organized and ready to sow!

#4 Know what to throw out!
I have bad news...seeds don't last forever.  Its true and that's why its important to go through and edit your seed stash every year. Seeds get old and as they do their ability to germinate declines.  So how do you know what is maybe getting old or is no longer good?  Start by looking at those dates on the seed packets.

Save this date!
Oops that may me cost later.
If you forget and accidentally cut off the date its good to have a pencil handy to make note of that date on the package somewhere so you don't loose track of it again.  This is important because take onions for instance, onion seed is only good for one year which means you will need to replace it every year while tomato seeds last for several years.  The old seed can be tossed onto compost heap and if you're lucky, some of it may sprout but don't hold your breath.  Finally its a lot more fun to find unexpected plants you can transplant than to find the seeds you have sown were dead after you waited a month for them to germinate so just get rid of them already!

#5 - Knowing when to sow.
Its easy to find good information on this subject out there today.  Tons of garden blogs offer tips, Local Master Gardener offices and websites have seed sowing schedules as do seed companies and even some nurseries.  When you find one that suits your region keep a copy of it in with your seed stash, it will save your bacon and help you stay on track with your sowing.  It was interesting when over and over again I found people suggesting seeds should be stored in the order in which they are sown seasonally.  What genius!  A system that tells you what needs to be sown by a quick peek in the stash box!  Another thing about this system is it is not static but a migrating system.  That means if you have a crop like kale, that is sown more than once in a growing season, you just transfer that packet of seeds from its first position in the system up to the next month/season it needs to be sown in and it will be ready and waiting when you are.  Its a really beautiful system for the home vegetable garden or any garden actually.

Extra seeds saved just to give away
#6 - Seeds are for sharing!
Storing seeds and swapping seeds are really beneficial to most gardeners as seed packets hold more seeds than the home gardener will use in a year in most cases.  This makes a well organized stash a gold mine of sorts for if you have extra seed and wish to share them with others or to have on hand for a little seed swapping.  Seed swapping is totally fun and can be addicting though so be ware!  If you have a lot of extra seeds consider your local food bank as a place you might share them with.  More people are gardening than ever and those seeds could go to help feed a family or beautify an elderly person's yard, so put those still viable seeds in the hands of folks who can use them up before they die.

Happy Gardening!

Copyright © 2011 by Patty Hicks
All rights reserved. No part of this blog may be reproduced or transmitted in any form or by any means, electronic or mechanical, including printing, recording or by any information storage and retrieval system without written permission from the author, except for the inclusion of brief quotations in a review. All reviews must include author's name and a link back to this blog.